
Boondi raita is a dish that completes every indian meal with its unique and refreshing taste. Boondi raita is a creamy, slightly tangy, spicy dish that is a perfect companion for dishes like biryani, paratha, and other indian meals.
Today, will check out not only how to make the classic boondi raita but also the other healthy twist variations of the boondi raita that you can have at home.
Check out our other drinks:
What is Boondi Raita?
Boondi Raita is an indian traditional dish made with yogurt and mixing of crispy fried flour balls (boondi), and adding a bit of spices to make it spicy and tasty.
- Texture: It’s creamy yet slightly crunchy (or soft, depending on how long you soak the boondi).
- Taste: Mildly spiced, cooling, and slightly tangy.
- Pairing: Goes brilliantly with spicy curries, pulao, parathas, biryanis, or simply as a refreshing dip or as a side dish.
Fun Fact: In North India, Recipes like boondi raita are a must-have in the summer season because of their cooling properties.
Ingredients for Boondi Raita
- 1 cup fresh thick curd
- ½ cup plain boondi
- ¼ TSP roasted cumin powder
- ¼ TSP red chili powder (as per your taste)
- ¼ TSP black salt (kala namak)
- Salt (as per your taste)
- 2 TSP finely chopped coriander leaves (optional)
- Water or chilled milk (to adjust consistency)
Healthier and Customization Options:
| Goal | Swap This | With This |
| Low Fat | Full-fat curd | Greek yogurt or low-fat yogurt |
| Vegan | Yogurt | Plant-based yogurt (almond, soy, coconut) |
| Extra Nutrition | Plain boondi | Add chopped cucumbers, pomegranate, and mint |
How to Make Boondi Raita
Making boondi raita at home is so easy. By going through our recipe, you’ll realize why you have bought it from the market for so many years.
Step 1
- If you want soft boondi, then soak the crunchy boondi in warm water for around 3-4 minutes and let it get slightly softened. Then squeeze the excess water gently.
- If you like crunchy boondi, skip soaking! Add it directly for an extra crunch in every bite.
Step 2
- In a large bowl, add the curd.
- Whisk it until it gets smooth and creamy, ensuring there are no lumps left.
- Add a little water or chilled milk if the curd feels too thick.
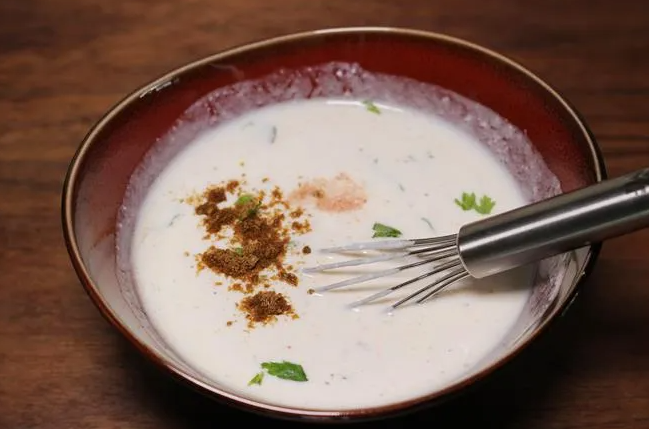
Step 3
- Mix in the roasted cumin powder, black salt, red chili powder, and regular salt.

- Whisk again until the spices are fully blended with the curd.
Step 4
- Add the soaked (or dry) boondi into the spiced yogurt.
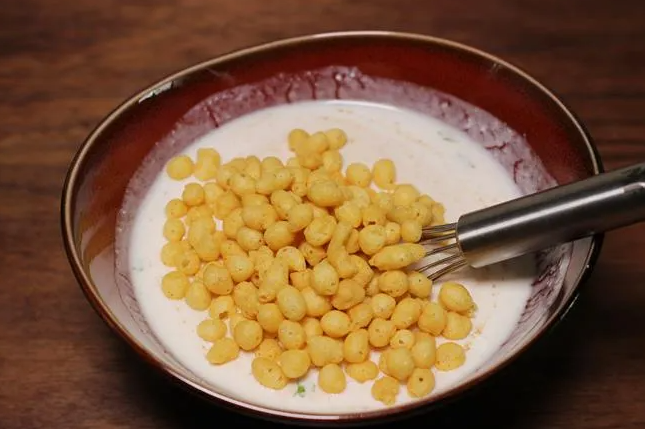
- Gently fold it in, making sure every boondi gets coated with the yogurt.
Step 5
- Sprinkle more roasted cumin and coriander leaves on top.
- Refrigerate for 15–20 minutes for the flavors to meld beautifully.
- Serve chilled for the best taste with any type of meal!
Boondi Raita Benefits
Believe it or not, this little side dish is packed with goodness! Here are the reasons why you should serve this to your loved ones in the summer with meals:
- Cooling Effect: Yogurt helps cool down your digestive system, especially helpful during summers.
- Good for Digestion
- Yogurt is Rich in Probiotics
- Hydration Support
- Protein-Rich
Cultural and Historical Insights on Boondi Raita
In India, the raita has been part of the dishes for centuries as it contains yogurt that helps in balancing the body heat and especially in the tropical region where the climate gets extremely hot.
Boondi, made from chickpea flour, adds a beautiful rustic touch, originating from Indian street food culture where crunchy snacks like sev, boondi, and papdi were added to everything from chaats to raitas.
Today, the boondi raita is used in weddings, festival meals, and even in regular meals that symbolize a richness and simplicity at the same time.
Boondi Raita Variations You Must Try
With the classic boondi raita, you can also fuzz it up with multiple variations:
- Masala Boondi Raita: Add chaat masala, black pepper, and finely chopped green chilies that add more spicier taste, and you can have masala boondi.
- Mint Boondi Raita: You can add mint leaves, which add a minty flavor to your boondi.
- Fruit Boondi Raita: Add pomegranate or finely chopped apples for a sweet textures and taste.
- Smoky Boondi Raita: Give it a quick charcoal smoke for a restaurant-style flavor.
Expert Tips
- Always use chilled curd for the best results.
- If you like slightly crunchy raita, add boondi just before serving.
Roast cumin seeds fresh and powder them at home—it enhances the flavor 10x!
Boondi Raita Recipe in Hindi
बूंदी रायता एक ऐसी डिश है जो अपने अनोखे और ताज़गी भरे स्वाद के साथ हर भारतीय भोजन को पूरा करती है। बूंदी रायता एक मलाईदार, थोड़ा तीखा, मसालेदार व्यंजन है जो बिरयानी, पराठा और अन्य भारतीय व्यंजनों जैसे व्यंजनों के लिए एकदम सही साथी है।
आज, न केवल क्लासिक बूंदी रायता बनाने की विधि की जाँच करेंगे बल्कि बूंदी रायता के अन्य स्वस्थ ट्विस्ट वैरिएशन भी देखेंगे जिन्हें आप घर पर बना सकते हैं।
बूंदी रायता क्या है?
बूंदी रायता एक भारतीय पारंपरिक व्यंजन है जिसे दही और कुरकुरी तली हुई आटे की गेंदों (बूंदी) के मिश्रण से बनाया जाता है, और इसे मसालेदार और स्वादिष्ट बनाने के लिए थोड़े मसाले डाले जाते हैं।
बनावट: यह मलाईदार लेकिन थोड़ा कुरकुरा (या नरम, इस बात पर निर्भर करता है कि आप बूंदी को कितनी देर तक भिगोते हैं)।
स्वाद: हल्का मसालेदार, ठंडा और थोड़ा तीखा।
जोड़ी: मसालेदार करी, पुलाव, पराठे, बिरयानी के साथ या बस एक ताज़ा डुबकी या साइड डिश के रूप में शानदार ढंग से चला जाता है।
मजेदार तथ्य: उत्तर भारत में, बूंदी रायता जैसी रेसिपी गर्मियों के मौसम में अपने ठंडे गुणों के कारण ज़रूर खाना चाहिए।
बूंदी रायता के लिए सामग्री
- 1 कप ताजा गाढ़ा दही
- ½ कप सादी बूंदी
- ¼ छोटा चम्मच भुना जीरा पाउडर
- ¼ छोटा चम्मच लाल मिर्च पाउडर (अपने स्वाद के अनुसार)
- ¼ छोटा चम्मच काला नमक
- नमक (अपने स्वाद के अनुसार)
- 2 छोटा चम्मच बारीक कटा धनिया पत्ता (वैकल्पिक)
- पानी या ठंडा दूध (स्थिरता समायोजित करने के लिए)
स्वस्थ और अनुकूलन विकल्प:
| लक्ष्य | इसे बदलें | इसके साथ |
| कम वसा | पूर्ण वसा वाला दही | ग्रीक दही या कम वसा वाला दही |
| शाकाहारी | दही | पौधे आधारित दही (बादाम, सोया, नारियल) |
| अतिरिक्त पोषण | सादी बूंदी | कटा हुआ खीरा, अनार और पुदीना डालें |
बूंदी रायता कैसे बनाएं
घर पर बूंदी रायता बनाना बहुत आसान है। हमारी रेसिपी को पढ़कर, आपको एहसास होगा कि आप इतने सालों से इसे बाज़ार से क्यों खरीद रहे हैं।
चरण 1
- अगर आपको नरम बूंदी चाहिए, तो कुरकुरी बूंदी को लगभग 3-4 मिनट के लिए गर्म पानी में भिगोएँ और इसे थोड़ा नरम होने दें। फिर अतिरिक्त पानी को धीरे से निचोड़ें।
- अगर आपको कुरकुरी बूंदी पसंद है, तो भिगोना न भूलें! हर निवाले में अतिरिक्त कुरकुरापन लाने के लिए इसे सीधे डालें।
चरण 2
- एक बड़े कटोरे में दही डालें।
- इसे तब तक फेंटें जब तक यह चिकना और मलाईदार न हो जाए, सुनिश्चित करें कि कोई गांठ न रह जाए
- अगर दही बहुत गाढ़ा लगे तो थोड़ा पानी या ठंडा दूध डालें।
चरण 3
- भुना हुआ जीरा पाउडर, काला नमक, लाल मिर्च पाउडर और सामान्य नमक मिलाएँ।
- मसाले के दही में पूरी तरह मिल जाने तक फिर से फेंटें।
चरण 4
- भिगोई हुई (या सूखी) बूंदी को मसालेदार दही में मिलाएँ।
- इसे धीरे से मिलाएँ, सुनिश्चित करें कि हर बूंदी दही से लिपटी हुई हो।
चरण 5
- ऊपर से भुना हुआ जीरा और धनिया पत्ती छिड़कें।
- स्वादों को खूबसूरती से मिलाने के लिए 15-20 मिनट के लिए फ्रिज में रखें।
- किसी भी तरह के खाने के साथ बेहतरीन स्वाद के लिए ठंडा परोसें!
बूंदी रायता के फायदे
मानें या न मानें, यह छोटी सी साइड डिश बहुत ही स्वादिष्ट है! यहाँ कुछ कारण बताए गए हैं कि आपको गर्मियों में अपने प्रियजनों को भोजन के साथ यह क्यों परोसना चाहिए:
- शीतलन प्रभाव: दही आपके पाचन तंत्र को ठंडा करने में मदद करता है, खासकर गर्मियों के दौरान।
- पाचन के लिए अच्छा
- दही प्रोबायोटिक्स से भरपूर है
- हाइड्रेशन सपोर्ट
- प्रोटीन से भरपूर
बूंदी रायता पर सांस्कृतिक और ऐतिहासिक अंतर्दृष्टि
भारत में, रायता सदियों से व्यंजनों का हिस्सा रहा है क्योंकि इसमें दही होता है जो शरीर की गर्मी को संतुलित करने में मदद करता है और खासकर उष्णकटिबंधीय क्षेत्र में जहाँ जलवायु बहुत गर्म हो जाती है।
चने के आटे से बनी बूंदी, एक खूबसूरत देहाती स्पर्श जोड़ती है, जिसकी उत्पत्ति भारतीय स्ट्रीट फ़ूड संस्कृति से हुई है जहाँ चाट से लेकर रायते तक हर चीज़ में सेव, बूंदी और पापड़ी जैसे कुरकुरे स्नैक्स डाले जाते थे। आज, बूंदी रायता का उपयोग शादियों, त्यौहारों के भोजन और यहाँ तक कि नियमित भोजन में भी किया जाता है जो एक ही समय में समृद्धि और सादगी का प्रतीक है।
बूंदी रायता के विभिन्न प्रकार जिन्हें आपको ज़रूर आज़माना चाहिए क्लासिक बूंदी रायता के साथ।
- मसाला बूंदी रायता: चाट मसाला, काली मिर्च और बारीक कटी हरी मिर्च डालें जो अधिक तीखा स्वाद देते हैं, और आप मसाला बूंदी बना सकते हैं।
- पुदीना बूंदी रायता: आप पुदीने के पत्ते डाल सकते हैं, जो आपकी बूंदी में पुदीने का स्वाद जोड़ते हैं।
- फल बूंदी रायता: मीठे बनावट और स्वाद के लिए अनार या बारीक कटे हुए सेब डालें।
- स्मोकी बूंदी रायता: रेस्टोरेंट जैसा स्वाद पाने के लिए इसे चारकोल से जल्दी से धुआँ दें।
विशेषज्ञ सुझाव
- बेहतरीन नतीजों के लिए हमेशा ठंडा दही इस्तेमाल करें।
- अगर आपको हल्का कुरकुरा रायता पसंद है, तो परोसने से ठीक पहले बूंदी डालें।
- जीरे को घर पर ही भूनकर पाउडर बना लें – इससे स्वाद 10 गुना बढ़ जाता है!
FAQ
Should I soak the boondi before adding it to the raita?
Soaking boondi in warm water for 5–10 minutes softens it and removes excess oil, resulting in a melt-in-the-mouth texture. However, if you prefer a crunchy texture, you can add the boondi directly to the yogurt just before serving.
How long can I store boondi raita?
Boondi raita can be stored in an airtight container in the refrigerator for up to 2 days. Keep in mind that the boondi will continue to absorb moisture and may become overly soft over time. For the best texture, it’s recommended to add boondi to the yogurt shortly before serving.
Is boondi raita suitable for weight loss?
Boondi raita can be part of a balanced diet when consumed in moderation. Using low-fat or Greek yogurt and limiting the amount of boondi can make it a healthier option. Remember that boondi is deep-fried, so portion control is key.
What kind of yogurt is best for boondi raita?
Fresh, thick, and slightly tangy yogurt is ideal. Greek yogurt can also be used for a creamier texture. If using Greek yogurt, you may need to thin it with a little water or milk to achieve the desired consistency.
What dishes pair well with boondi raita?
Boondi raita complements a variety of Indian dishes, including biryani, pulao, parathas, and spicy curries. It also serves as a refreshing side dish during hot weather.
What dishes pair well wCan I make boondi raita ahead of time?ith boondi raita?
Yes, you can prepare the spiced yogurt mixture a day in advance and refrigerate it. Add the boondi about 10–15 minutes before serving to maintain its desired texture.